教条
- .xls只有65536行, .xlsx有1048576行(2**20), 数据太大乖乖换分析工具
- openpyxl会先建立一张sheet
- 不要试图去用xlrd读取字体颜色, 历史遗留问题太多
- xlwt默认不会复写单元格
openpyxl
Documents: http://openpyxl.readthedocs.io/en/default/
xlwt
Documents: http://xlwt.readthedocs.io/en/latest/
xlrt
Documents: http://xlrd.readthedocs.io/en/latest/
Blog 整理
python中使用xlrd、xlwt操作excel表格详解
最近遇到一个情景,就是定期生成并发送服务器使用情况报表,按照不同维度统计,涉及python对excel的操作,上网搜罗了一番,大多大同小异,而且不太能满足需求,不过经过一番对源码的”研究”(用此一词让我觉得颇有成就感)之后,基本解决了日常所需。主要记录使用过程的常见问题及解决。
python操作excel主要用到xlrd和xlwt这两个库,即xlrd是读excel,xlwt是写excel的库。可从这里下载[https://pypi.python.org/pypi][1]。下面分别记录python读和写excel.
python读excel——xlrd
这个过程有几个比较麻烦的问题,比如读取日期、读合并单元格内容。下面先看看基本的操作:
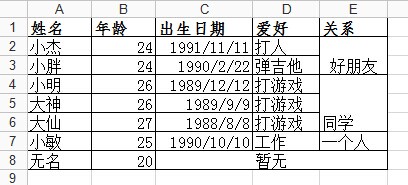
首先读一个excel文件,有两个sheet,测试用第二个sheet,sheet2内容如下:

python 对 excel基本的操作如下:
1
2
3
4
5
6
7
8
9
10
11
12
13
14
15
16
17
18
19
20
21
22
23
24
25
26
27
28
29
30
31
32
33
34
35
|
import xlrd
import xlwt
from datetime import date,datetime
def read_excel():
workbook = xlrd.open_workbook(r'F:\demo.xlsx')
print workbook.sheet_names()
sheet2_name = workbook.sheet_names()[1]
sheet2 = workbook.sheet_by_index(1)
sheet2 = workbook.sheet_by_name('sheet2')
print sheet2.name,sheet2.nrows,sheet2.ncols
rows = sheet2.row_values(3)
cols = sheet2.col_values(2)
print rows
print cols
print sheet2.cell(1,0).value.encode('utf-8')
print sheet2.cell_value(1,0).encode('utf-8')
print sheet2.row(1)[0].value.encode('utf-8')
print sheet2.cell(1,0).ctype
if __name__ == '__main__':
read_excel()
|
运行结果如下:

那么问题来了,上面的运行结果中红框框中的字段明明是出生日期,可显示的确实浮点数。好的,来解决第一个问题:
1、python读取excel中单元格内容为日期的方式
python读取excel中单元格的内容返回的有5种类型,即上面例子中的ctype:
1
| ctype : 0 empty,1 string, 2 number, 3 date, 4 boolean, 5 error
|
即date的ctype=3,这时需要使用xlrd的xldate_as_tuple来处理为date格式,先判断表格的ctype=3时xldate才能开始操作。现在命令行看下:
1
2
3
4
5
6
7
8
9
10
11
12
13
14
15
| >>> sheet2.cell(2,2).ctype #1990/2/22
>>> sheet2.cell(2,1).ctype #24
>>> sheet2.cell(2,0).ctype #小胖
>>> sheet2.cell(2,4).ctype #空值(这里是合并单元格的原因)
>>> sheet2.cell(2,2).value #1990/2/22
33656.0
>>> xlrd.xldate_as_tuple(sheet2.cell_value(2,2),workbook.datemode)
(1992, 2, 22, 0, 0, 0)
>>> date_value = xlrd.xldate_as_tuple(sheet2.cell_value(2,2),workbook.datemode)
>>> date_value
(1992, 2, 22, 0, 0, 0)
>>> date(*date_value[:3])
datetime.date(1992, 2, 22)
>>> date(*date_value[:3]).strftime('%Y/%m/%d')
'1992/02/22'
|
即可以做下简单处理,判断ctype是否等于3,如果等于3,则用时间格式处理:
1
2
3
| if (sheet.cell(row,col).ctype == 3):
date_value = xlrd.xldate_as_tuple(sheet.cell_value(rows,3),book.datemode)
date_tmp = date(*date_value[:3]).strftime('%Y/%m/%d')
|
那么问题又来了,上面 sheet2.cell(2,4).ctype 返回的值是0,说明这个单元格的值是空值,明明是合并的单元格内容”好朋友”,这个是我觉得这个包功能不完善的地方,如果是合并的单元格那么应该合并的单元格的内容一样,但是它只是合并的第一个单元格的有值,其它的为空。
1
2
3
4
5
6
7
8
9
10
11
12
13
14
15
16
17
18
19
20
21
22
| >>> sheet2.col_values(4)
[u'\u5173\u7cfb', u'\u597d\u670b\u53cb', '', u'\u540c\u5b66', '', '', u'\u4e00\u4e2a\u4eba', '']
>>> for i in range(sheet2.nrows):
print sheet2.col_values(4)[i]
关系
好朋友
同学
一个人
>>> sheet2.row_values(7)
[u'\u65e0\u540d', 20.0, u'\u6682\u65e0', '', '']
>>> for i in range(sheet2.ncols):
print sheet2.row_values(7)[i]
无名
20.0
暂无
>>>
|
2、读取合并单元格的内容
这个是真没技巧,只能获取合并单元格的第一个cell的行列索引,才能读到值,读错了就是空值。
即合并行单元格读取行的第一个索引,合并列单元格读取列的第一个索引,如上述,读取行合并单元格”好朋友”和读取列合并单元格”暂无”只能如下方式:
1
2
3
4
5
6
7
| >>> print sheet2.col_values(4)[1]
好朋友
>>> print sheet2.row_values(7)[2]
暂无
>>> sheet2.merged_cells
[]
|
疑问又来了,合并单元格可能出现空值,但是表格本身的普通单元格也可能是空值,要怎么获取单元格所谓的”第一个行或列的索引”呢?
这就要先知道哪些是单元格是被合并的!
3、获取合并的单元格
读取文件的时候需要将formatting_info参数设置为True,默认是False,所以上面获取合并的单元格数组为空,
1
2
3
4
| >>> workbook = xlrd.open_workbook(r'F:\demo.xlsx',formatting_info=True)
>>> sheet2 = workbook.sheet_by_name('sheet2')
>>> sheet2.merged_cells
[(7, 8, 2, 5), (1, 3, 4, 5), (3, 6, 4, 5)]
|
merged_cells返回的这四个参数的含义是:(row,row_range,col,col_range),其中[row,row_range)包括row,不包括row_range,col也是一样,即(1, 3, 4, 5)的含义是:第1到2行(不包括3)合并,(7, 8, 2, 5)的含义是:第2到4列合并。
利用这个,可以分别获取合并的三个单元格的内容:
1
2
3
4
5
6
| >>> print sheet2.cell_value(1,4)
好朋友
>>> print sheet2.cell_value(3,4)
同学
>>> print sheet2.cell_value(7,2)
暂无
|
发现规律了没?是的,获取merge_cells返回的row和col低位的索引即可! 于是可以这样一劳永逸:
1
2
3
4
5
6
7
8
9
10
11
12
13
| >>> merge = []
>>> for (rlow,rhigh,clow,chigh) in sheet2.merged_cells:
merge.append([rlow,clow])
>>> merge
[[7, 2], [1, 4], [3, 4]]
>>> for index in merge:
print sheet2.cell_value(index[0],index[1])
暂无
好朋友
同学
>>>
|
python写excel——xlwt
写excel的难点可能不在构造一个workbook的本身,而是填充的数据,不过这不在范围内。在写excel的操作中也有棘手的问题,比如写入合并的单元格就是比较麻烦的,另外写入还有不同的样式。这些要看源码才能研究的透。
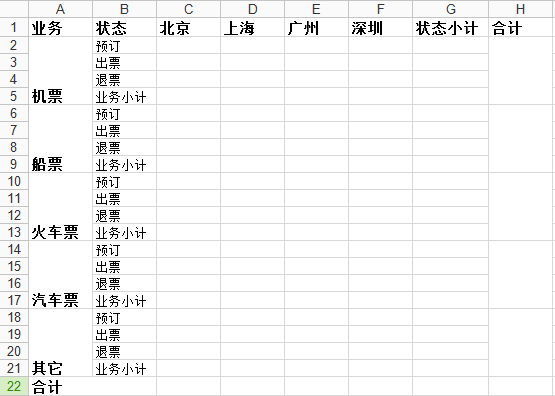
我”构思”了如下面的sheet1,即要用xlwt实现的东西:

基本上看起来还算复杂,而且看起来”很正规”,完全是个人杜撰。
代码如下:
1
2
3
4
5
6
7
8
9
10
11
12
13
14
15
16
17
18
19
20
21
22
23
24
25
26
27
28
29
30
31
32
33
34
35
36
37
38
39
40
41
42
43
44
45
46
47
48
49
50
51
52
53
54
55
56
57
58
59
60
61
62
63
64
65
| '''
设置单元格样式
'''
def set_style(name,height,bold=False):
style = xlwt.XFStyle()
font = xlwt.Font()
font.name = name
font.bold = bold
font.color_index = 4
font.height = height
style.font = font
return style
def write_excel():
f = xlwt.Workbook()
'''
创建第一个sheet:
sheet1
'''
sheet1 = f.add_sheet(u'sheet1',cell_overwrite_ok=True)
row0 = [u'业务',u'状态',u'北京',u'上海',u'广州',u'深圳',u'状态小计',u'合计']
column0 = [u'机票',u'船票',u'火车票',u'汽车票',u'其它']
status = [u'预订',u'出票',u'退票',u'业务小计']
for i in range(0,len(row0)):
sheet1.write(0,i,row0[i],set_style('Times New Roman',220,True))
i, j = 1, 0
while i < 4*len(column0) and j < len(column0):
sheet1.write_merge(i,i+3,0,0,column0[j],set_style('Arial',220,True))
sheet1.write_merge(i,i+3,7,7)
i += 4
j += 1
sheet1.write_merge(21,21,0,1,u'合计',set_style('Times New Roman',220,True))
i = 0
while i < 4*len(column0):
for j in range(0,len(status)):
sheet1.write(j+i+1,1,status[j])
i += 4
f.save('demo1.xlsx')
if __name__ == '__main__':
write_excel()
|
需要稍作解释的就是write_merge方法:
write_merge(x, x + m, y, w + n, string, sytle)x表示行,y表示列,m表示跨行个数,n表示跨列个数,string表示要写入的单元格内容,style表示单元格样式。其中,x,y,w,h,都是以0开始计算的。
这个和xlrd中的读合并单元格的不太一样。
如上述:sheet1.write_merge(21,21,0,1,u’合计’,set_style(‘Times New Roman’,220,True))
即在22行合并第1,2列,合并后的单元格内容为”合计”,并设置了style。
如果需要创建多个sheet,则只要f.add_sheet即可。
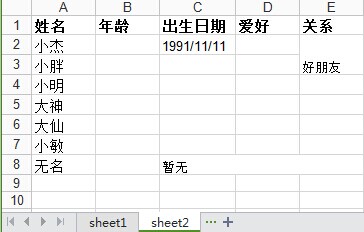
如在上述write_excel函数里f.save(‘demo1.xlsx’) 这句之前再创建一个sheet2,效果如下:

代码也是真真的easy的了:
1
2
3
4
5
6
7
8
9
10
11
12
13
14
15
16
17
18
19
20
21
| '''
创建第二个sheet:
sheet2
'''
sheet2 = f.add_sheet(u'sheet2',cell_overwrite_ok=True)
row0 = [u'姓名',u'年龄',u'出生日期',u'爱好',u'关系']
column0 = [u'小杰',u'小胖',u'小明',u'大神',u'大仙',u'小敏',u'无名']
for i in range(0,len(row0)):
sheet2.write(0,i,row0[i],set_style('Times New Roman',220,True))
for i in range(0,len(column0)):
sheet2.write(i+1,0,column0[i],set_style('Times New Roman',220))
sheet2.write(1,2,'1991/11/11')
sheet2.write_merge(7,7,2,4,u'暂无')
sheet2.write_merge(1,2,4,4,u'好朋友')
f.save('demo1.xlsx')
|
日期写入
如何通过Python写入date数据了?
写入还是很简单的。
1
2
3
4
5
6
7
8
9
10
11
| import xlwt3
import datetime as dt
workbook = xlwt.Workbook()
worksheet = workbook.add_sheet('Sheet1')
worksheet.write(0, 0, dt.date.today())
workbook.save('test.xls')
|
查看一下,确实写入了,但变成了一个数字。怎么回事了,原来excel保存日期采用的是float类型保存。
查看worksheet.write:
Help on method write in module xlwt3.worksheet:
write(self, r, c, label=b’’, style=<xlwt3.style.XFStyle object>) method of xlwt3
.worksheet.Worksheet instance
太简单了,label是什么?
只能查看源码了:
1
2
| def write(self, r, c, label=b"", style=style.default_style):
self.row(r).write(c, label, style)
|
继续挖掘:
1
2
3
4
5
6
7
8
9
10
11
12
13
14
15
16
17
18
19
20
21
22
23
24
25
| def write(self, col, label, style=style.default_style):
self.__adjust_height(style)
self.__adjust_bound_col_idx(col)
style_index = self.__parent_wb.add_style(style)
if isinstance(label, str):
if len(label) > 0:
self.insert_cell(col,
StrCell(self.__idx, col, style_index, self.__parent_wb.add_str(label))
)
else:
self.insert_cell(col, BlankCell(self.__idx, col, style_index))
elif isinstance(label, bool): # bool is subclass of int; test bool first
self.insert_cell(col, BooleanCell(self.__idx, col, style_index, label))
elif isinstance(label, (float, int, Decimal)):
self.insert_cell(col, NumberCell(self.__idx, col, style_index, label))
elif isinstance(label, (dt.datetime, dt.date, dt.time)):
date_number = self.__excel_date_dt(label)
self.insert_cell(col, NumberCell(self.__idx, col, style_index, date_number))
elif label is None:
self.insert_cell(col, BlankCell(self.__idx, col, style_index))
elif isinstance(label, formula.Formula):
self.__parent_wb.add_sheet_reference(label)
self.insert_cell(col, FormulaCell(self.__idx, col, style_index, label))
else:
raise Exception("Unexpected data type %r" % type(label))
|
原来:
1
2
3
| elif isinstance(label, (dt.datetime, dt.date, dt.time)):
date_number = self.__excel_date_dt(label)
self.insert_cell(col, NumberCell(self.__idx, col, style_index, date_number))
|
label的数值,会先进行判断,然后进行处理。
这样,只需要设置一下style就可以了!
1
2
3
4
5
6
7
| dateFormat = xlwt.XFStyle()
dateFormat.num_format_str = 'yyyy/mm/dd'
worksheet.write(0, 0, dt.date.today(),dateFormat)
workbook.save('test.xls')
|
搞定。
注意一下:
python的date 和excel的date是不一样的。
实验一下:
1
2
3
4
5
6
7
8
9
10
11
12
13
14
| dt.date.today().toordinal()
```python
735768
读取一下excel的数值了?
```python
import xlrd
worksheetRead = xlrd.open_workbook('test.xls')
sheetRead=Rd.sheet_by_index(0)
sheetRead.cell(0,0).value
42174
|
差别真不小!!
WHY?
原来:python是从公元1年1月1日开始的天数转换 的!
excel是从1899年12月 31号开始的。
做一个函数转换一下即可:
1
2
3
4
5
6
| __s_date = dt.date (1899, 12, 31).toordinal() - 1
def getdate(date ):
if isinstance(date , float ):
date = int(date )
d = dt.date .fromordinal(__s_date + date )
return d
|
ok,over!!


